TheHive and Cortex on AWS — AMI tutorials part 1: Deploying a SecOps VPC
In part 1, we will have a look at the reference SecOps VPC architecture used as the target environment for TheHive and Cortex…

TheHive and Cortex on AWS — AMI tutorials — Part 1: Deploying a SecOps VPC
Welcome to this article series on deploying TheHive and Cortex AMIs on AWS. We are publishing these tutorials alongside our AMI user guides to better illustrate what real-life deployments look like, whether you are new to AWS or already up and running with a production-ready VPC ready to host your new instances. The focus will be set on automated provisioning using Terraform but we will also cover the basics if you want to launch the AMIs manually using the AWS console.
TL; DR;
Terraform sample codeAMI user guidesterraform.tfvarsterraform applyThe AMIs were built with operations in mind to easily fit in most AWS setups. For instance, we opted to store all data in dedicated EBS volumes in order to have a disposable root filesystem. This way you can easily replace an existing instance when a new AMI version is available instead of manually updating packages. Downtime for your users can be limited to the time required for your load balancer to switch traffic from instance A to instance B (a few milliseconds?). Resizing independent data volumes is also a lot easier as no action is required within the instance at the operating system level.
These tutorials will thus cover many operations topics over time, starting with the initial launch of both TheHive and Cortex. In part 1, we will have a look at the reference SecOps VPC architecture used as the target environment throughout the tutorials.
Why should I bother with this VPC setup?
While you could technically launch both AMIs in any public subnet and access them over http, we strongly advise against that for obvious reasons. We opted not to package public-facing components with the images (such as reverse proxy / certificate manager / https listener) to make them as flexible as possible with existing infrastructures. Whatever solution you choose, please expose your instances behind something that will enable https.
Users new to AWS or who want to setup TheHive and Cortex in a new VPC can build a brand-new SecOps VPC based on our sample Terraform code. We intended for the resulting architecture and documentation to be production-ready and not just a proof-of-concept full of “don’t do this in real life” warnings. We have based our reference setup on several AWS services but you can of course use anything you want, there are no hardcoded links to them in the AMIs.
If you plan on running the AMIs in your existing VPC and wish to use our Terraform sample code to do so, you are welcome to read along anyway. Even if you don’t need to build a new VPC, it will help you adapt the sample Terraform code to best fit your existing environment.
Both AMI user guides already explain in-depth the Terraform sample code we provide. In these tutorials, we will focus on using the code to deploy TheHive and Cortex.
Terra-what?
We mentioned earlier that we would be using Terraform to automate building the VPC and launching the AMIs. If you are not yet familiar with it, know that it is an Infrastructure as Code (IaC) tool developed by Hashicorp. It allows for automated resource provisioning using declarative code. In other words, you describe the infrastructure resources you want to end up with and let Terraform perform the associated technical tasks.
Hashicorp provides a quick introduction of the tool. This will allow you to install the product and get ready to proceed with the rest of these tutorials.
AWS credentials
Terraform will require privileges on your AWS account. There are several ways of providing these credentials, one of which is very bad: hardcoding them in your code. So please don’t do that.
Terraform can use the AWS CLI credentials file. This is what we will base our examples upon. You do not need to install the AWS CLI to use this file, it’s a simple text file.
On Linux, simply touch ~/.aws/credentials (you can set a custom file location with the AWS_SHARED_CREDENTIALS_FILE environment variable) and create two named profiles: default and secops.
- For the default profile, include a aws_access_key_id and aws_secret_access_key with invalid values just like in the example below. The default profile is the profile used by default (yup!). Unless you never ever need to use different IAM profiles, providing invalid default credentials will make it impossible to run something without explicitly inputing the profile you want to use. This way you are less likely to run code in the wrong context. You may want to avoid this only if you are already on an EC2 instance and use an instance profile. Invalid default credentials will most likely conflict with the IAM instance role.
- For the secops profile, provide your IAM user credentials. This is the profile we will be using to create our VPC and deploy our instances.
[default]aws_access_key_id=AKINVALIDaws_secret_access_key=wrongsecretaccesskey[secops]aws_access_key_id=AK123456789aws_secret_access_key=xxxxxxxIf you need help creating your AWS access key, please refer to this AWS tutorial.
Network architecture considerations
In this tutorial, we will use AWS-managed services to handle network routing and https sessions:
- ALB (Application Load Balancer) to publicly expose our applications and route network traffic to our instances
- Route53 for public and private DNS management (and automatic certificate validation / renewal)
- Certificate Manager for the https certificate (and its automatic renewal)
We recommend those services as they are fully managed and easy to use. But if you already have certificates, DNS and a load balancer or reverse proxy, feel free to use them. As stated earlier, there are no hardcoded links to any of the aforementioned AWS services in our AMIs. Let’s Encrypt and NGINX will work just as fine.
Both instances will be deployed in a private subnet as we want to illustrate a production-ready scenario. We will also launch a bastion host located in a public subnet to remotely SSH into our instances and a NAT gateway to allow our private instances outgoing access to the Internet.
Please note that most of these AWS services are not free nor included in the free-tier except maybe for the bastion host which defaults to a t2.micro that can be free if you are not already running one.
Terraform sample code organisation
The AMI user guides Terraform code is organised in five folders:
ug-secops-vpc--> to create and manage the SecOps VPCug-secops-thehive-new--> to deploy a new TheHive instance with an empty databaseug-secops-thehive-migration--> to deploy a new TheHive instance with existing data (upgrade / replace scenario)ug-secops-cortex-new--> to deploy a new Cortex instance with an empty databaseug-secops-cortex-migration--> to deploy a new Cortex instance with existing data (upgrade / replace scenario)
This code organisation allows the creation of all required VPC resources if you do not already operate a VPC (or if you want to create a new one for your SecOps needs), independently from TheHive and Cortex deployments.
The sample code to launch TheHive and Cortex instances defaults to this new VPC but can easily be adapted to fit your existing VPC by customising a few variables. Unless your architecture significantly differs from our reference VPC, you should not be required to modify the Terraform code itself.
SecOps VPC overview
These are the resources we will be creating alongside our VPC:
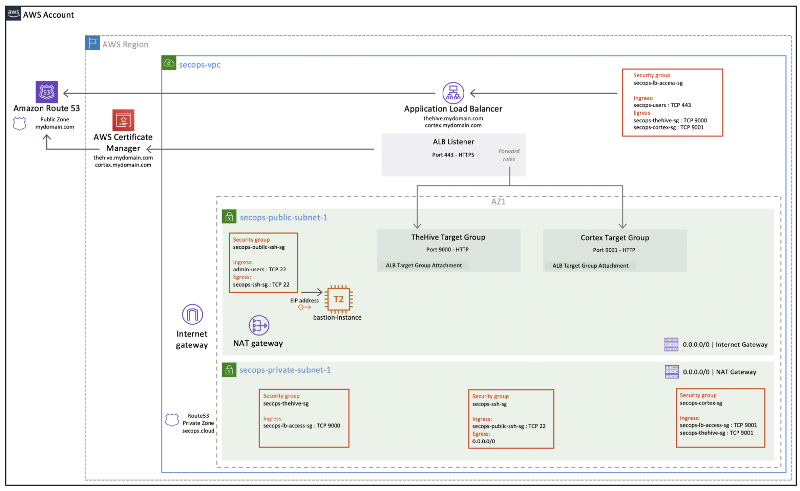
SecOps VPC prerequisites
While most VPC resources will be provisioned with Terraform, there are a two exceptions that should be created beforehand:
- The Route53 public DNS zone to register the load balancer
- The ACM (AWS Certificate Manager) certificate for the https listener
These resources could be created with Terraform but we considered it made more sense to manage them independently to avoid destroying them along with the VPC since they can take a while to create / validate / propagate. Also, your public DNS zone might be shared with other services!
We will use a single load balancer and a single https listener for both TheHive and Cortex. While multiple certificates can be attached to the ALB https listener (using Server Name Indication), our sample code will use a single certificate, so remember to include both hostnames for TheHive and Cortex when you create it. Otherwise, you will need to attach both certificates to the listener and manage the SNI configuration yourself.
SecOps VPC — customising Terraform variables
You will need to customise a few Terraform variables before you can create the VPC. Go to the ug-secops-vpc folder and set the following variables in the terraform.tfvars file:
secops_iam_profile--> AWS credentials profile name ("secops" in our example above)secops_users_cidr--> Whitelist of IPs that will be allowed access to TheHive and Cortex (set to 0.0.0.0/0 to make public)secops_alb_certificate--> ARN of your ACM certificate to attach to the https listenersecops_r53_public_dns_zone_id--> Route53 public DNS zone IDsecops_r53_thehive_record--> FQDN for TheHivesecops_r53_cortex_record--> FQDN for Cortexsecops_r53_private_dns_zone_name--> Private DNS zone name for VPC local name resolution (to easily SSH into our private instances through the bastion host and to help TheHive find its Cortex mate). While the VPC private DNS works in split-horizon, it is a good practice to use either a domain name from a non-existent TLD or a domain name you already own.secops_ssh_users_cidr--> Whitelist of IPs that will be allowed SSH access to the bastion hostsecops_key_pair_name--> Name of new keypair that will be created to connect to the bastion host (must be unique, the name should not already exist in your account)secops_key_pair_public_key--> Your public key to associate with the keypair
SecOps VPC — Terraform deployment
You are all set to deploy the VPC, you can now:
terraform initif you have not yet initialised your Terraform environmentterraform planto get an overview of the resources that will be createdterraform applyto proceed with the actual VPC deployment
Once the deployment is over, Terraform will output the public IP address of the bastion host. You won’t need to connect to the bastion host for this tutorial, we will only use it as a jumphost to connect to our TheHive and Cortex instances later on. Note down this public IP address as we will need it. You can always redisplay the output using the terraform output command while in the ug-secops-vpc folder.
You could also register a public DNS record for your bastion host. We didn’t include this in our sample code as we prefer to keep bastion hosts harder to find on the public internet.
Next steps
Congratulations, your SecOps VPC is all set! You can connect to the AWS console if you want to see the resources you just created.
You are now ready to launch TheHive and Cortex. Join us in part 2 of these tutorials!
Cleaning up
Should you wish to cleanly destroy everything we created, you can simply run the terraform destroy command from the ug-secops-vpc folder.
If you have already deployed TheHive and Cortex, you should destroy their associated resources before destroying the VPC. In other words, run the terraform destroy command from both TheHive and Cortex folders first.
Any thoughts or questions?
We look forward to your feedback on these tutorials and on the AMI distributions of TheHive and Cortex. Get in touch with us anytime at aws@strangebee.com.